Foire Aux Questions / Tutoriels
Comment utiliser Inspecto need
Comment utiliser Inspecto code
Questions générales autour de la suite logicielle SPILEn Inspecto
Comment utiliser Inspecto need
Nous vous présentons ici les principales fonctionnalités d’Inspecto need. Lors de la souscription d'un abonnement, vous aurez aussi accès à une formation en ligne. D'autres formations complémentaires et plus poussées sont possibles si vous le souhaitez.
Prise en main d'Inspecto need
Inspecto need est une application de gestion des exigences. Elle vous permet de créer vos exigences, de les formaliser, de les analyser et de les exporter vers vos projets de développement logiciel.
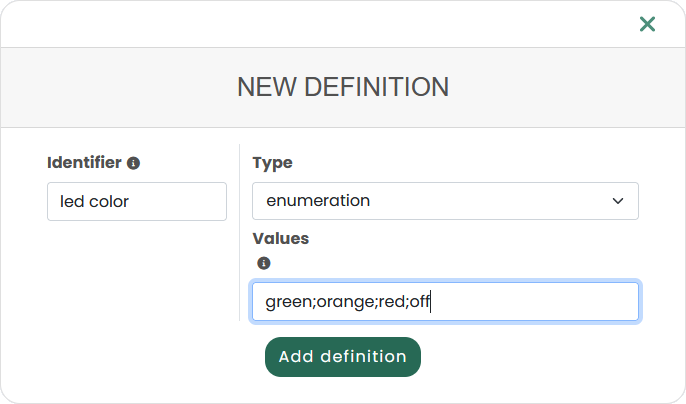
Pour garantir une bonne pratique, nous vous recommandons de définir d'abord le domaine dans la section Définition du domaine. Cette étape, bien que facultative, permet de s'assurer que les éléments que vous utiliserez dans vos exigences sont correctement délimités. Par exemple, vous pouvez définir que la variable couleur de la led ne peut être que verte, orange, rouge ou éteinte.
Une fois que cela est fait, vous pouvez commencer à rédiger vos exigences dans la section Exigences. Le plus simple est de commencer par les besoins des utilisateurs, que vous pouvez exprimer librement (en suivant les recommandations de l'analyseur d'ambiguïté), puis de les affiner en exigences plus formelles qui peuvent être utilisées avec le code Inspecto pour générer des tests.
Enfin, vous pouvez exporter vos exigences, soit vers GitHub ou GitLab, soit au format JSON ou Word en utilisant l'exportateur. Tous les membres de l'équipe de projet peuvent également les importer directement dans le code Inspecto.
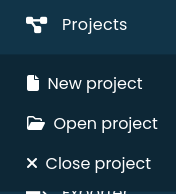
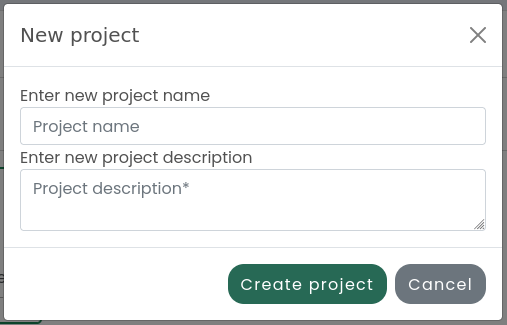
Un projet peut être créé au moyen du menu Projects afin d’y regrouper les demandes clients associées. Il suffit ensuite d’entrer un nom et une description.
Une fois le projet créé, plusieurs sections sont accessibles :
- Requirements : il s’agit des demandes clients, consultez la section associée ici pour plus de détails.
- Domain definition : il s’agit de l’environnement global des exigences, consultez la section associée ici pour plus de détails.
- Exporter : permet d’exporter les exigences rédigées dans un fichier. Consultez la section associée ici pour plus de détails.
- Project settings : cette section permet de configurer la connexion du projet à d’autres outils, et de gérer l’équipe associée au projet. Consultez la section associée ici pour plus de détails.
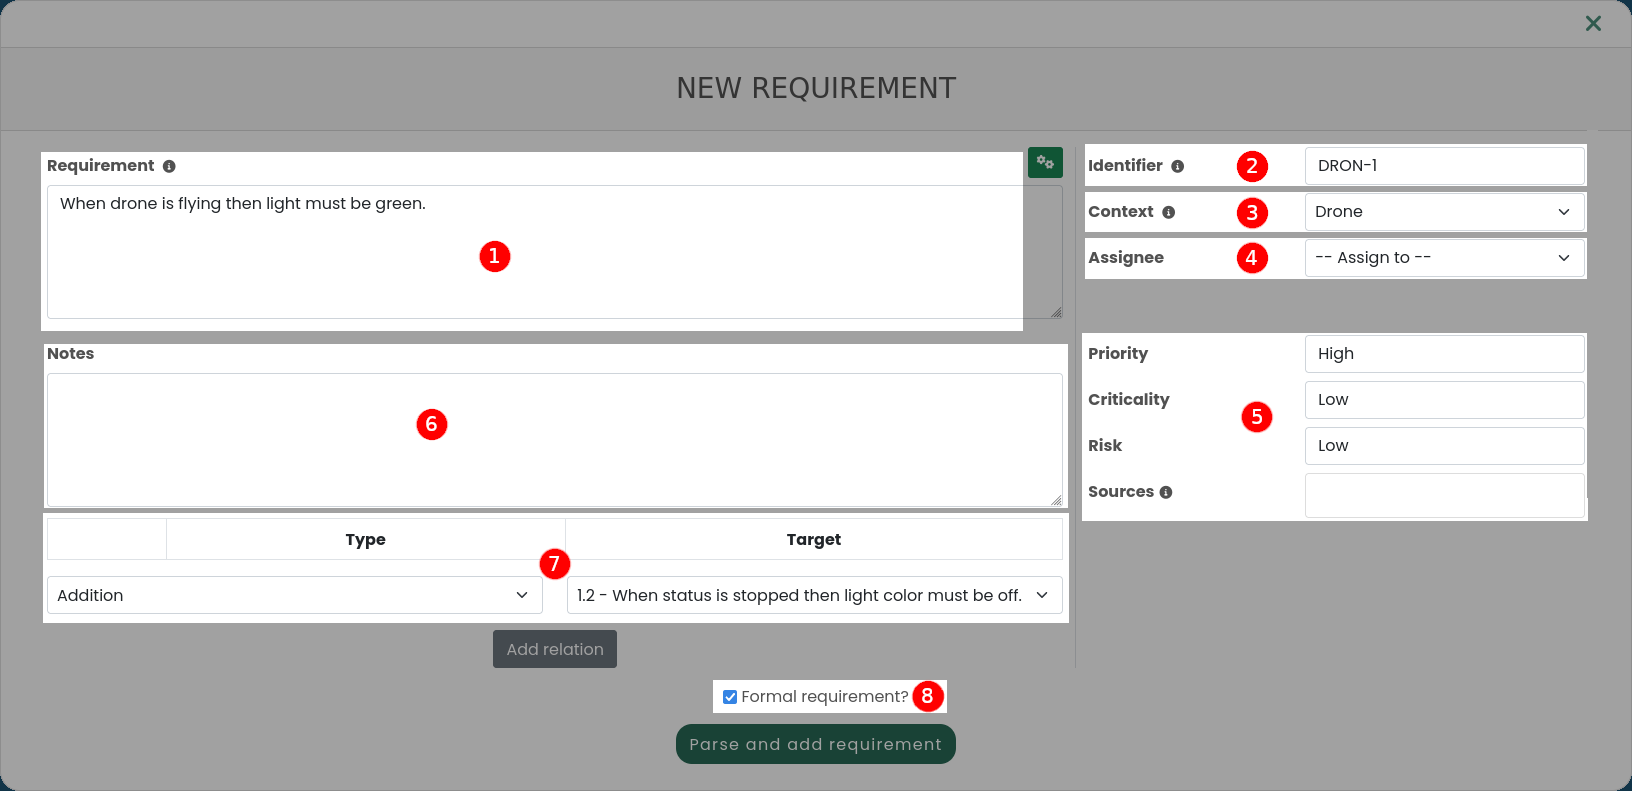
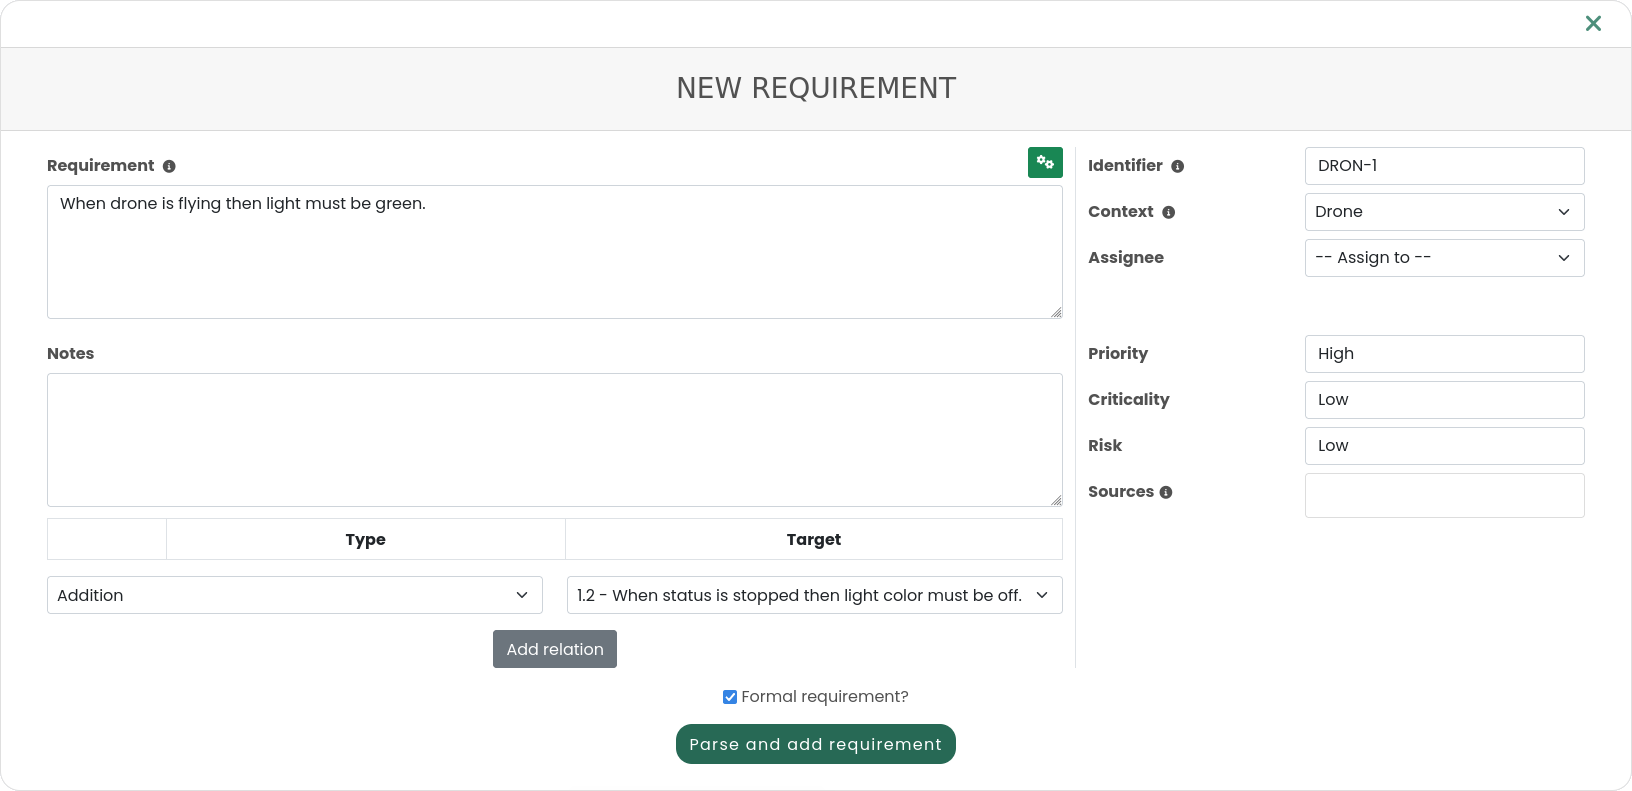
La fenêtre Nouvelle exigence peut être décomposée en 7 parties, comme décrit ci-dessous :
-
ExigenceDans ce champ, vous pouvez écrire vos exigences, de manière formelle ou non. L'éditeur propose une autocomplétion avec la commande ctrl + space pour vous guider dans la rédaction d'exigences formelles.
C'est le champ qui sera analysé par l'analyseur d'ambiguïté (et par l'analyseur formel si l'exigence est déclarée comme formelle). -
IdentifiantDans Inspecto need, il est obligatoire d'avoir un identifiant unique pour chaque besoin. Le plus souvent, ils sont de la forme
1.2.3, mais vous pouvez utiliser la notation de votre choix. -
ContexteLe contexte de l'exigence correspond au système auquel elle se réfère. Ainsi, pour une exigence
When the power supply is on, then the status led must be on, c'est le contexte qui permet de préciser que l'on parle de l'alimentation électrique et du voyant d'état d'un ordinateur par exemple. -
AssignéL'utilisateur affecté au travail sur l'exigence (rédaction ou développement).
-
Metadata
Les métadonnées sont associées aux exigences et peuvent être utilisées pour ajouter des informations spécifiques. Il sera possible de les modifier dans la prochaine version.
-
Notes
Ce champ est destiné aux notes libres que vous souhaitez ajouter à une exigence dans le but de donner des informations annexes ou des précisions autour de l'exigence.
-
Relations
Vous pouvez créer des relations avec d'autres exigences. Ces relations sont les suivantes :
- Addition:
-
Une exigence est une addition à une autre exigence si elle spécifie plus de propriétés.
Exemple: “The drone shall retrieve destination of handled parcel from an existing web service and transport it to this destination” est une addition à “When a parcel is handled by the drone, the drone shall transport it to its destination”. - Contrainte:
-
Une exigence est une contrainte d'une autre exigence si elle spécifie les mêmes propriétés mais dans un contexte plus restreint.
Exemple: “When delivery order is given and when the battery is low, the drone shall send a notification and stay in the charge pad” est une version plus contrainte de “When the battery is under 10%, the drone shall stay in charge and a notification of battery status shall be available for the user”. - Contradiction:
-
Une exigence contredit une autre exigence si vous ne pouvez pas les satisfaire toutes les deux en même temps.
Exemple: “At any time, the drone shall avoid obstacles, fly at the minimum safe height and be able to stop in less than 1 second” contredit “When the battery is under 10% then the drone shall switch to recovery mode and land quickly”. - Partition:
-
Une exigence fait partie d'une autre exigence si la première exigence participe à la satisfaction de la seconde.
Exemple: “When the battery is under 10% then the drone shall switch to recovery mode” est une partie de “When the distance to warehouse is more than 500 meters and when the drone battery is under 10%, then the drone shall switch to recovery mode, send a location message and land quickly”. - Raffinement:
-
Une exigence est un raffinement d'une autre si elle introduit une nouvelle propriété et/ou si elle affaiblit les contraintes.
Exemple: “When the drone handle a parcel, then it shall transport it carefully” peut être raffiné en “At any time, the drone shall avoid obstacles, fly at the minimum safe height and be able to stop in less than 1 second.”. - Répetition:
-
Une exigence répète une autre exigence si elle spécifie les mêmes propriétés avec les mêmes contraintes.
Exemple: “When activated, the drone shall take over a parcel (pick it in the warehouse and deliver it)” répète “The drone shall pick up a parcel, go to the destination and drop it off when activated on the web application”.
Notez que même si nous voulons éviter les répétitions et les contradictions, il est important, si vous en détectez, de les identifier.
-
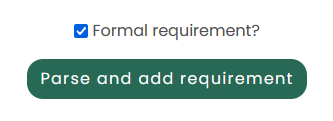
Validation formelleSi cette case est cochée, le bouton Add requirement sera changé en Parse and add requirement et en cliquant dessus, une analyse formelle sera effectuée avant d'ajouter l'exigence.
Les exigences formelles sont des exigences exprimées en utilisant une grammaire qui permet à Inspecto de les analyser.
Plus la proportion d'exigences formelles est importante, plus le risque d'ambiguïtés et de malentendus liés aux exigences est faible.
Bien sûr, l'idée n'est pas de rédiger toutes les exigences de manière formelle, mais de partir d'exigences non formelles, proches des besoins de l'utilisateur, puis de les affiner petit à petit jusqu'aux exigences finales, qui sont formelles.
Les exigences formelles sont composées de deux parties :
- contraintes (introduites par le mot-clé
when); - propriétés (introduites par le mot-clé
then).
Donc, une exigence formelle est un ensemble de propriétés qui doivent être satisfaites compte tenu des contraintes.
La forme grammaticale d'une exigence formelle est donc :
When <contraintes> then <propriétés>
Les contraintes et les propriétés concernent la valeur des variables (c.à.d des éléments) de votre système ou domaine.
L'idée principale est d'exprimer quelle devrait être la valeur des variables lorsque d'autres variables ont une certaine valeur.
Par exemple, lorsque vous écrivez When the power supply is on, then the status led must be on, vous définissez que la valeur de status led est on quand la valeur de power supply est on.
La forme grammaticale pour exprimer une contrainte est :
<variable> <opérateur de comparaison> <valeur>
Les variables sont définies à l'aide de mots, de manière classique. Vous pouvez également utiliser des phrases nominales reliées par des prépositions pour parler de sous-éléments, par exemple the led of the dashboard sera compris comme l'élément led contenu dans l'élément dashboard.
Les opérateurs de comparaison sont les classiques :
- égalité (en utilisant le mot-clé
is); - différence (en utilisant le mot-clé
is not); - inégalités strictes (en utilisant le mot-clé
is less thanoris greater than); - inégalités non strictes (en utilisant le mot-clé
is less or equal tooris greater or equal to).
La valeur peut être de type :
- booléen;
- caractère ou chaîne;
- entier;
- réel;
- énumeration;
- ou même d'autres variables.
Si les variables et les valeurs ne changent pas pour les propriétés, la syntaxe est légèrement différente puisqu'il faut introduire un verbe modal :
<variable> <verbe modal> <oéprateur de comparaison> <valeur>
les verbes modaux modifient les opérateurs de comparaison qui les suivent (le verbe être est à l'infinitif, ex. be less than à la place de is less than) et sont:
must;shall;could;would.
A tout moment, si vous êtes en train de rédiger une exigence formelle, vous pouvez appuyer sur le bouton Parse and add requirement pour vérifier que votre exigence formelle est écrite correctement.
Une exigence en langue naturelle est une exigence exprimée en langue naturelle et n’est pas analysée. Ces exigences permettent d’exprimer les besoins globaux et initiaux, sans formalisation.
Elles ont donc pour intérêt de pouvoir regrouper un ensemble de demandes, de conserver une traçabilité des demandes client ou d’écrire une demande qui ne peut pas être formalisée.
Inspecto code générera la structure de test associée à cette exigence et fera le lien entre le code et l’exigence mais ne pourra pas générer les différents cas de tests, qui restent à la charge du développeur.
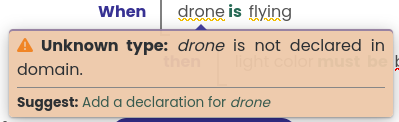
Chaque variable exprimée dans les exigences est définie par un domaine.
Inspecto need infère le type des variables en utilisant le contexte, mais il est possible de le définir strictement afin de :
- éviter d'utiliser une variable en dehors de son domaine (ex. utiliser une variable comme un réel alors que c'est un entier) ;
- restreindre le domaine d'une variable (ex. dire que la variable
led colorne peut qu'êtregreen,orange,redouoff).
Il existe différents types de définition de domaine, décrits ci-dessous :
-
LittérauxCe sont les types littéraux les plus simples : booléen, caractère, double, entier, chaîne de caractères.
-
ÉnumerationUne énumération est une liste de valeurs possibles attribuées à un élément.
-
StructureUne structure contient des éléments définis avec un type :

-
RéférenceCe type fait référence à une définition de domaine préalablement définie.
Ceci se fait à l'aide de la section Définition du domaine d'Inspecto need. Il suffit d'ajouter une nouvelle définition, en donnant un type à une variable donnée. Inspecto need l'analysera ensuite dans le projet en fonction de ce type.
L'objectif d'une règle de glossaire est de remplacer un élément de l'exigence par un autre.
Cela peut être utilisé pour remplacer des mots ou groupes de mots par d'autres (par exemple des acronymes par leurs définitions) ou pour abstraire des tournures formelles (par exemple, abstraire des données chiffrées). Vous pouvez définir différents types de définitions de glossaire :
- les définitions sans éléments variables : le texte est remplacé tel quel;
- définitions avec éléments variables : le texte est remplacé sauf pour les éléments variables qui sont capturés (ex. la règle
{x} voleavec comme remplacementl'altitude de {x} est supérieur à 0permettra de remplacer toutes les phrases de typel'avion voleparl'altitude de l'avion est supérieur à 0).

Ceci se fait à l'aide de la section Définition de glossaire d'Inspecto need. Il suffit d'ajouter une nouvelle définition, en donnant un texte avec ou sans élément variable. Inspecto need remplacera les éléments de la première partie de la défintion dans les exigences.
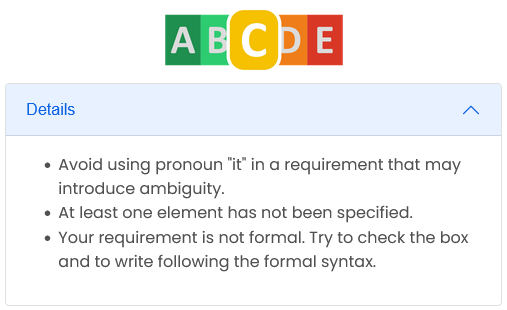
Le score d'ambiguïté des exigences va de A à E, en fonction de la détection du modèle d'ambiguïté.
Si le score d'ambiguïté d'une exigence est différent de A, en allant sur la page détaillée de l'exigence, vous pouvez obtenir des informations sur ce qui est détecté comme ambigu dans l'exigence en cliquant sur le bouton accordéon "détails".
Vous avez deux possibilités pour améliorer le score global de vos exigences :
- modifier une exigence et tenir compte des conseils donnés dans la section "Détails" du score d'ambiguïté ;
- affiner une exigence ambiguë par une autre exigence, plus précise.
Avertissement: Des améliorations peuvent être apportées aux définitions, un avertissement jaune accompagné de quelques suggestions vous aidera à améliorer votre score d'ambiguïté.
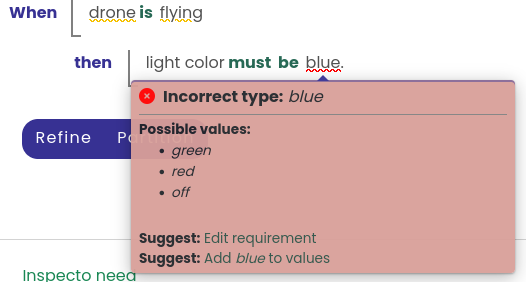
Erreur: Certaines valeurs de votre exigence n'existent pas dans le champ des possibles défini dans la définition du domaine. Une popup rouge vous aidera à résoudre le problème et à trouver une solution appropriée pour améliorer votre score d'ambiguïté.
Questions sur des fonctionnalités spécifiques d'Inspecto need
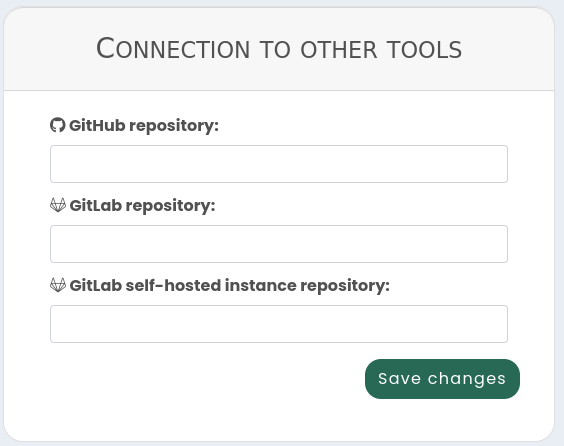
Dans les paramètres d’un projet, vous pouvez retrouver la section Connection to other tools qui permet de connecter votre projet Inspecto need à un projet GitHub ou GitLab.
Cette connexion vous permettra d’importer l’ensemble de vos tickets labellisés “Requirement” et de les synchroniser avec les exigences sur Inspecto need.
Options de tracking :
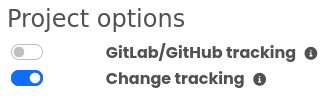
Ces options permettent deux types de synchronisation avec les éléments de votre dépôt GitLab ou GitHub.
- GitLab/GitHub tracking : si cette option est activée, la synchronisation avec les tickets de votre dépôt distant se fera automatiquement.
- Change tracking : si cette option est activée, chaque modification sur une exigence sera sauvegardée sur votre dépôt distant sous forme de modification du ticket associé.
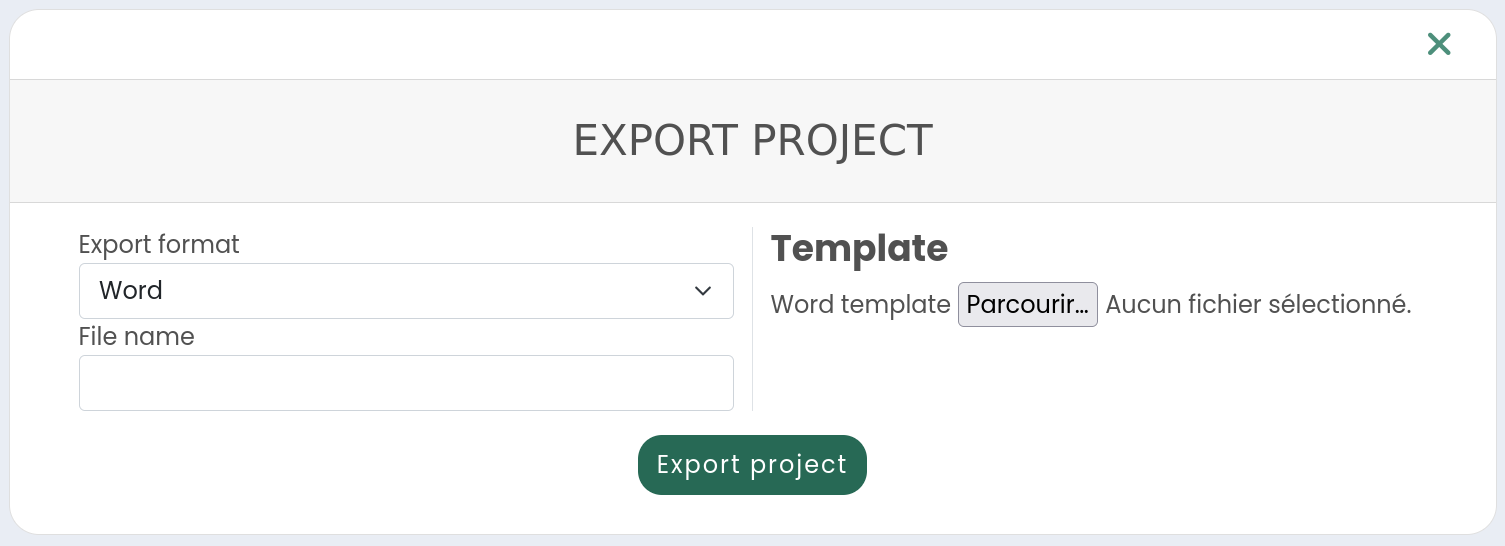
Au travers du menu Exporter , il est possible d’exporter les exigences d’un projet :
- Au format Word : pour générer un fichier qui servira de base à un cahier des charges par exemple ;
- Au format JSON : pour sérialiser les exigences dans un fichier qui pourra facilement être utilisé par d’autres outils.
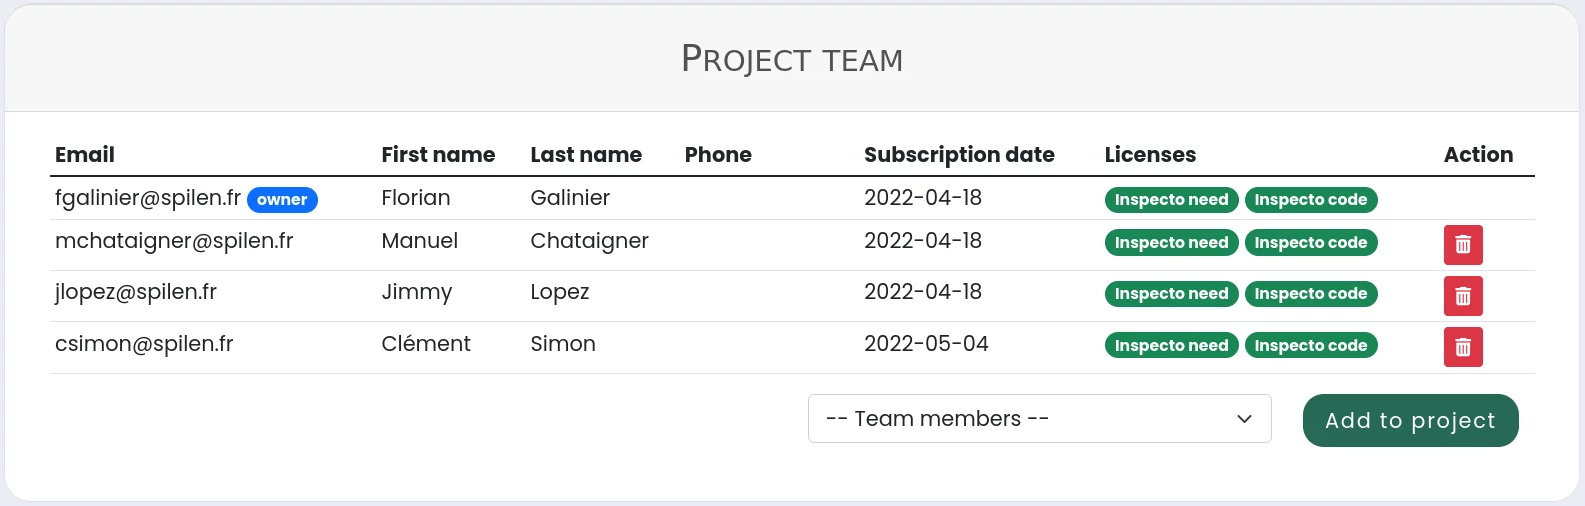
Pour chaque projet, une équipe est définie par le créateur du projet. Seul le créateur du projet peut y ajouter ou supprimer des membres.
Une liste récapitulative de l’ensemble des membres de l’équipe d’un projet est visible dans la section Project Settings 〉Projet Team  .
Celle-ci contient les données de chaque membre, incluant les licences activées.
.
Celle-ci contient les données de chaque membre, incluant les licences activées.
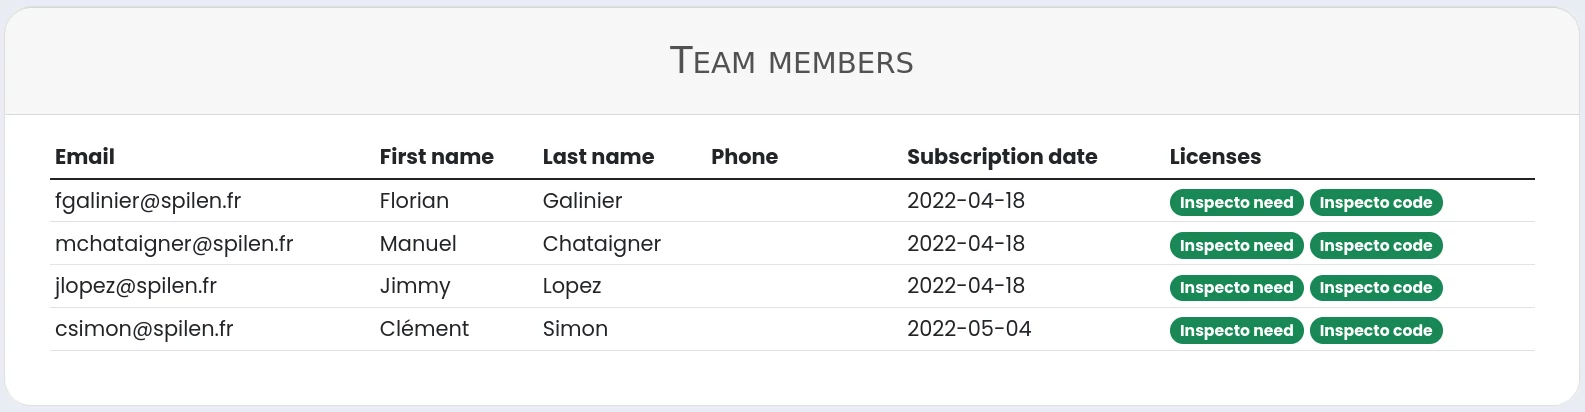
De même, l’ensemble des membres que vous gérez sont présents dans la section Profile 〉Team members 
Comment utiliser Inspecto code ?
Nous vous présentons ici les principales fonctionnalités d’Inspecto code. Lors de la souscription d'un abonnement, vous aurez aussi accès à une formation en ligne. D'autres formations complémentaires et plus poussées sont possibles si vous le souhaitez.
Prise en main d'Inspecto code
Inspecto code est un logiciel de génération automatique de tests, directement lié aux projets Inspecto need dont vous êtes membre. Vous pourrez ainsi récupérer l’ensemble des exigences rédigées au préalable sur Inspecto need.
Inspecto code permet de générer vos tests de comportement et d’acceptation dans le langage de programmation de votre choix.
Après avoir lié les tests générés à votre code, vous pouvez lancer vos tests depuis Inspecto code et observer quelles exigences sont satisfaites ou non par l’application.
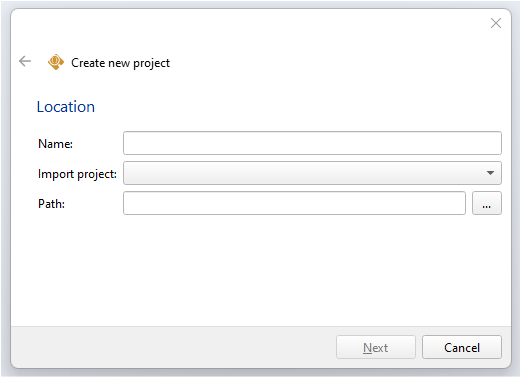
A partir du Menu 〉File 〉New Project ou directement avec l'icône 
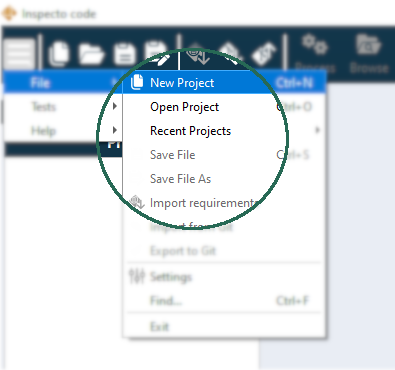
Dans l’assistant qui apparaît, entrez le nom de votre projet et le dossier dans lequel vous voulez placer votre projet.
A l’aide du menu déroulant, il est possible d’indiquer le projet Inspecto need sur lequel on travaille.
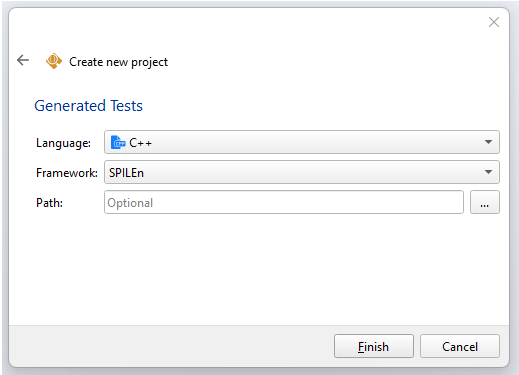
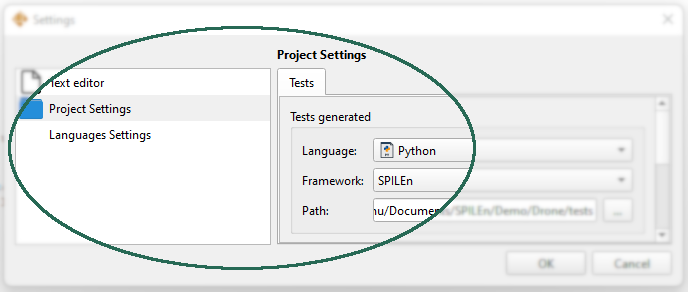
Sur la page suivante, indiquez les spécificités de la génération des tests de votre projet, comme le langage, le framework de tests utilisé ou la localisation des fichiers de tests.
Un projet peut être importer ou exporter vers des dépôts distants(Inspecto need, GitLab, GitHub, Jira)..
Import depuis Inspecto need
Importez vos exigences depuis un projet Inspecto need dont vous êtes membre.
Import depuis GitLab/GitHub
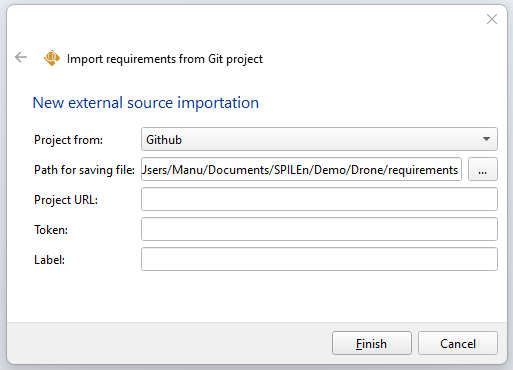
Importez les tickets d’un projet GitHub ou GitLab, en spécifiant ou non un label particulier. Une fois votre projet créer, à partir du Menu 〉File 〉Import from Git ou directement avec l’icône de la barre d’outil , avec les données suivantes :
- Project from : GitHub
- Path for saving file : 〈le dossier où sauvegarder l’import (par défaut il s’agit du dossier des exigences du projet)〉
- Project URL : 〈l’URL de votre dépot〉
- Token : 〈le token si votre dépôt distant est privé, laissez vide si le dépôt est public〉
- Label : 〈le label des exigences que vous voulez importer, laissez vide pour tout importer〉
Import depuis Jira
De la même manière que pour GitHub ou GitLab, vous pouvez importer un projet deouis un dépôt distant Jira.Export vers GitLab, GitHub ou Jira
Une fois votre import fait, votre dépôt distant sera associé à votre projet et vous pourrez exporter vos exigences directement avec l'icône de la barre d’outil.
Il existe plusieurs visualisations possibles de vos exigences selon votre besoin.
La visualisation sous forme de liste de l’ensemble de vos exigences, qui vous permet en un coup d'œil de voir toutes vos exigences et l’état de chacune.

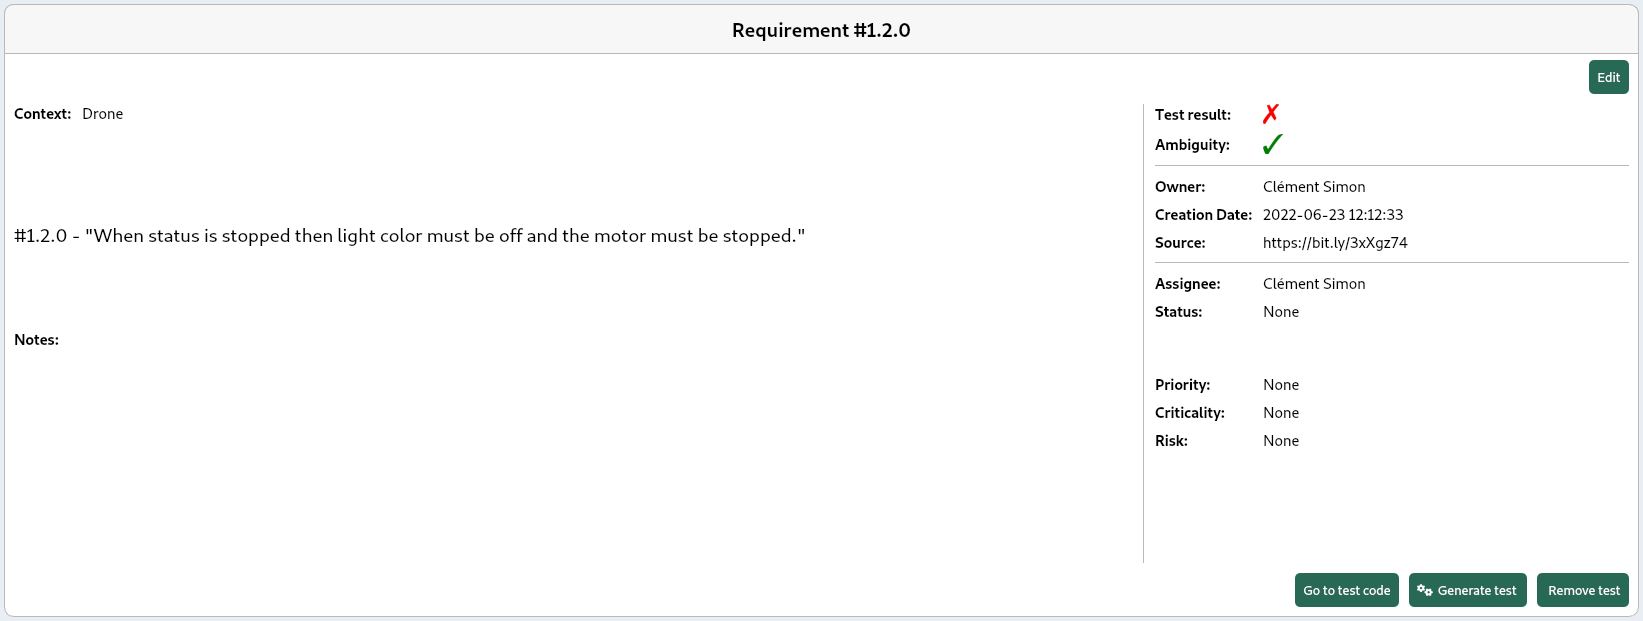
La visualisation sous forme de ticket, qui vous permet d’avoir toutes les données liées à une exigence (textes, metadata, membre assigné).
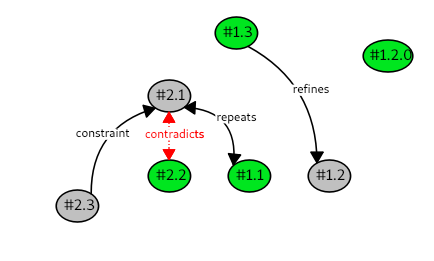
La visualisation graphique, qui vous permet de voir les liens entre vos exigences depuis l'onglet Graph view. Ainsi, vous pourrez observer en vert l'ensemble minimum des exigences à satisfaire pour faire fonctionner la totalité de vos tests.
Il est également possible d’ouvrir les fichiers .req dans l’éditeur de texte via un clic-droit 〉Open in editor.
Il est possible de générer les fichiers de tests associés aux exigences à l’aide du menu Tests 〉Process project ou directement avec le bouton Process dans la barre d'outils. Vos fichiers seront générés dans le sous dossier tests.
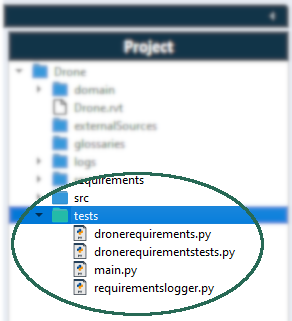
Les tests générés sont organisés en deux types de fichier :
- les fichiers contenant le corps des méthodes de test (Oracle) qui ont la forme 〈fichierReq〉requirements.
Il est à la charge de l’utilisateur de compléter les corps de méthode des exigences non formelles ; - les fichiers contenant les différents cas de tests nommés 〈fichierReq〉requirementstests.
Dans ces fichiers il y a besoin d'initialiser correctement les objets testés.
 .
.
Il est possible de naviguer facilement entre une exigence et le code de test associé.
Pour celà il existe, depuis la vue détaillée d’une exigence, un bouton Go to test code .
Inversement, on peut revenir à une exigence avec la commande ctrl + space depuis les identifiants présents dans le commentaire des méthodes de test.
.
Inversement, on peut revenir à une exigence avec la commande ctrl + space depuis les identifiants présents dans le commentaire des méthodes de test.

Vous devez intégrer les tests générés dans vos développements. Compilez ces tests avec votre application puis liez l’exécutable produit à Inspecto code à l'aide du menu Tests 〉Browse executable ou bien à l’aide du bouton  dans la barre d’outils .
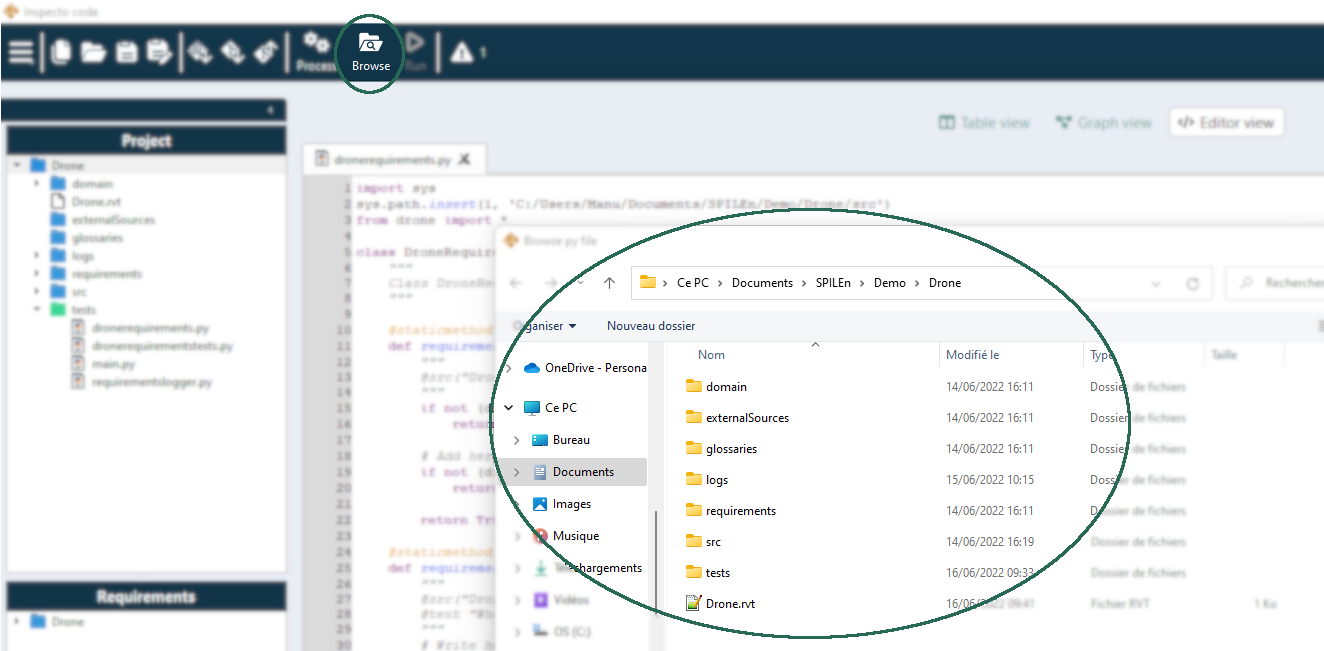
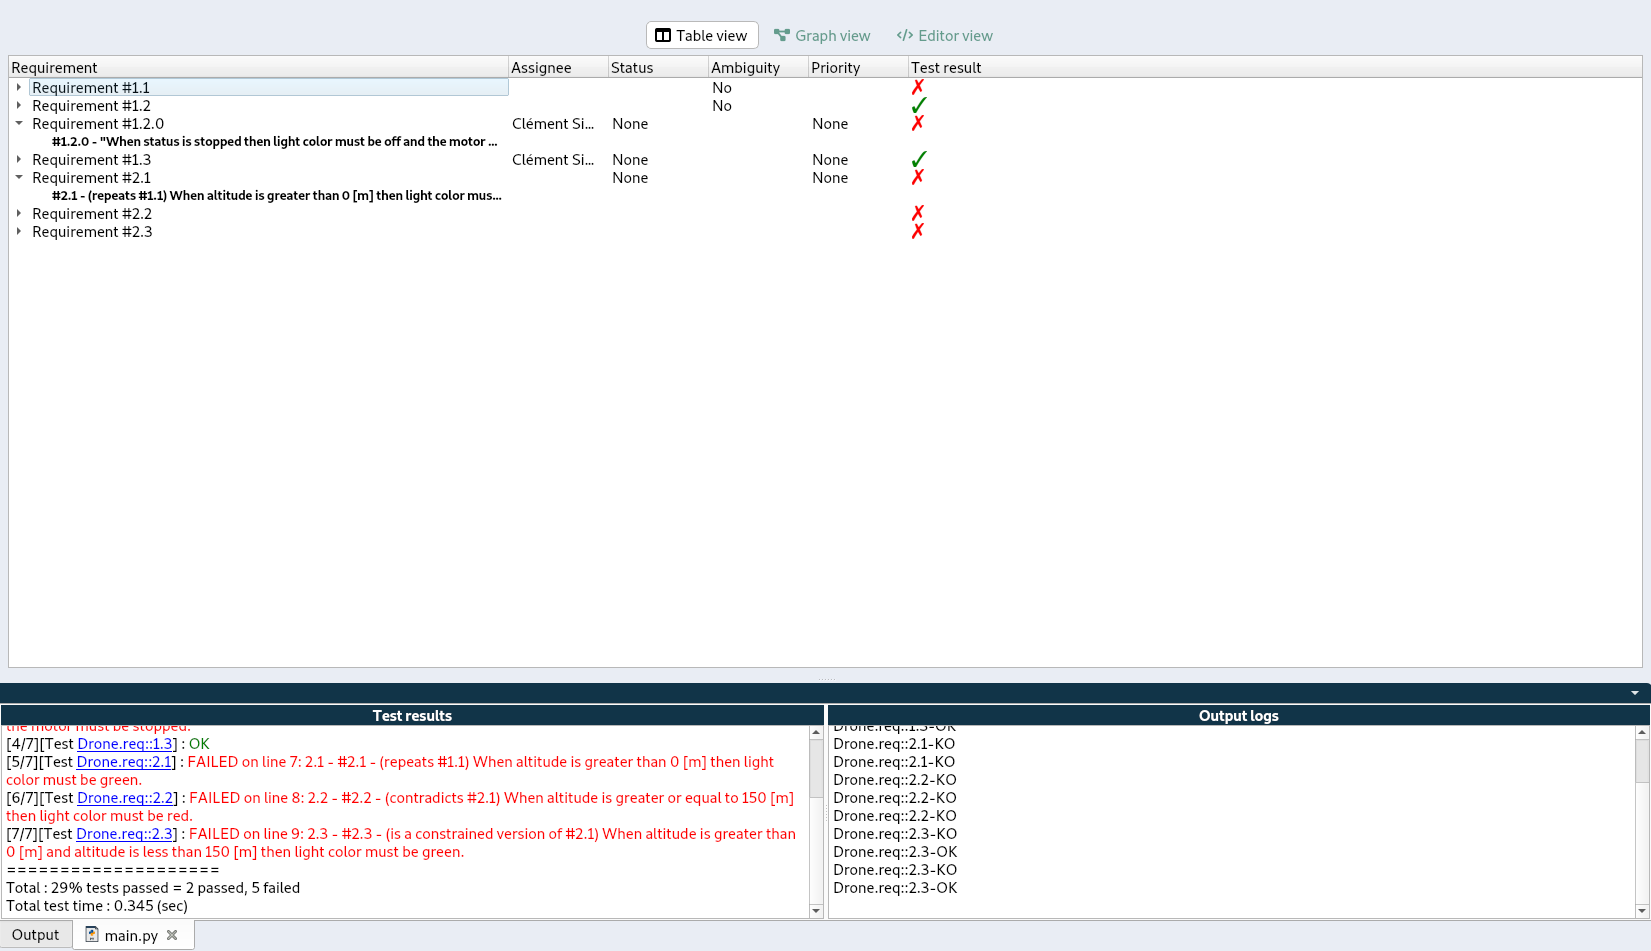
Une fois les tests liés au code de l’application, il est possible d’avoir un aperçu des résultats depuis l’application Inspecto Code.
Il est possible de lier un fichier exécutable pour les projets C++, un jar pour les projets Java ou encore le fichier main généré pour les langages interprétés comme Python.
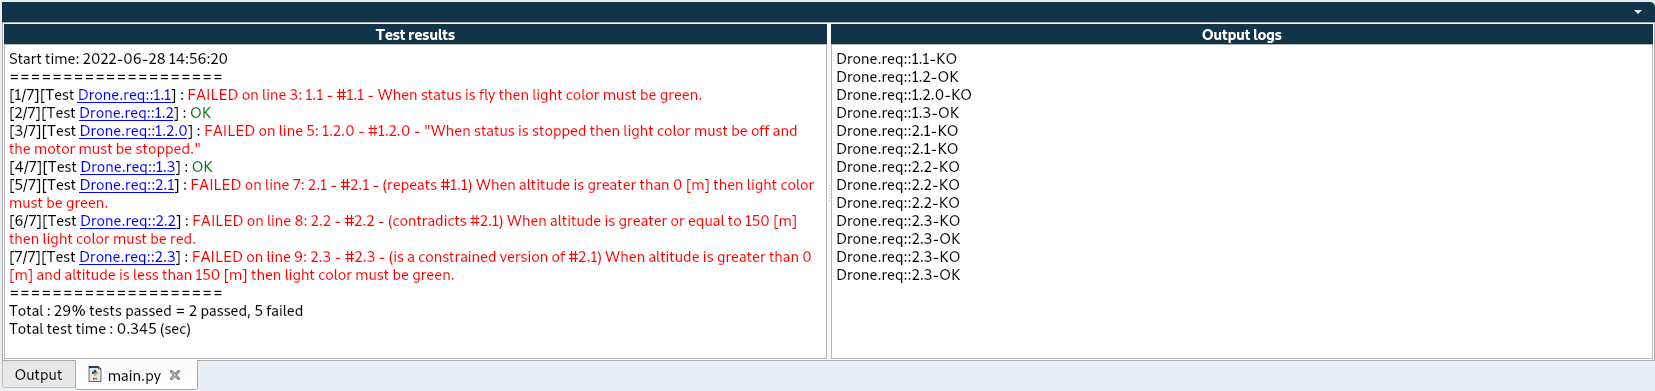
Une fois le fichier exécutable lié, on peut alors lancer les tests via le bouton Run> .
Les résultats apparaissent dans la console.
.
Les résultats apparaissent dans la console.
Questions sur des fonctionnalités spécifiques d'Inspecto code
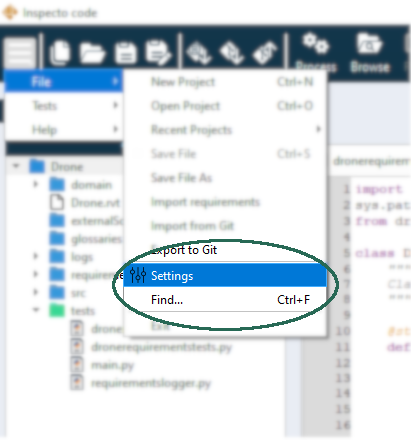
Certains paramètres de l'application comme le langage de génération ou la taille de la police sont modifiables dans les Paramètres de Inspecto code, accessible via le Menu 〉File 〉Settings.
Il existe plusieurs langages de génération possibles, disponibles dans les Paramètres de l'application Inspecto code.
Afin de garder une traçabilité entre les demandes client et leur provenance, Inspecto code permet de lier des documents à un projet, un fichier ou une exigence particulière.
Pour ce faire, il suffit après un clic-droit sur le dossier externalSources et de sélectionner Add new external source.
Sur l’assistant qui s’affiche, il est ensuite possible de choisir le type de lien, puis le fichier à lier.
Questions générales autour de la suite logicielle SPILEn Inspecto
Il suffit de vous inscrire sur le site grâce au formulaire de la page Inscription. Vous aurez alors accès à votre espace personnel et nous vous contacterons prochainement pour vous permettre d’obtenir une ou plusieurs licences dont vous aurez la gestion.
Le compte manager est le compte de la personne gérant l'ensemble des licences de son équipe ou de l'entreprise. Il peut alors choisir d’activer ou de désactiver les licences des utilisateurs.
Le dysfonctionnement d'une licence peut-être dû à plusieurs facteurs. Tout d'abord, contactez votre manager pour vérifier que votre licence est bien activée. Sinon, selon votre cas, référez-vous à la section Je n'arrive pas à me connecter à Inspecto need ou à la section Je n'arrive pas à me connecter à Inspecto code présentes ci-dessous.
Il existe plusieurs raisons qui peuvent vous empêcher de vous connecter à Inspecto need :
- Erreur dans la combinaison email/mot de passe : Vous ne connaissez plus votre mot de passe ou vous n'avez pas encore de compte, contactez votre manager pour qu'il vous donne accès à une licence ou contactez nous.
- Aucune licence activée : Votre licence est désactivée. Contactez votre manager pour qu'il réactive votre licence ou contactez nous.
- Un problème est apparu de notre côté : Il est possible qu'un problème soit subitement apparu de notre côté. Dans ce cas, allez sur notre site www.spilen.fr ou sur nos réseaux pour plus d'information.
Il existe plusieurs raisons qui peuvent vous empêcher de vous connecter à Inspecto code :
- Erreur dans la combinaison email/mot de passe : Vous ne connaissez plus votre mot de passe ou vous n'avez pas encore de compte, contactez votre manager pour qu'il vous donne accès à une licence ou contactez nous.
- Aucune licence activée : Votre licence est désactivée. Contactez votre manager pour qu'il réactive votre licence ou contactez nous.
- Connecté depuis plusieurs endroit : Si vous êtes connecté depuis un autre appareil en même temps, cela signifie que quelqu'un d'autre utilise votre compte. Cependant, il est interdit de partager une même licence entre plusieurs personnes. Cependant, il est interdit de partager une même licence entre plusieurs personnes. Dans ce cas, si vous forcez la connexion vous serez déconnecté du lieu de votre précédente connexion.
- Un problème est apparu de notre côté : Il est possible qu'un problème soit subitement apparu de notre côté. Dans ce cas, allez sur notre site www.spilen.fr ou sur nos réseaux pour plus d'information.
Contrairement à une approche BDD utilisée dans Cucumber, nous avons une approche plus abstraite car nous nous orientons sur les exigences. On pourrait qualifier cette approche de RDD (Requirement Driven Development). Pour faire le lien avec les fichiers Gherkin, nous pouvons les ouvrir dans notre application mais aucune analyse n'est effectuée dessus. En les transformant en fichier d'exigences avec Inspecto need, vous pourrez générer les tests associés.